Transformation logic guide
Transformation logic is written in Javascript. If you're unfamiliar with Javascript, there are many ways to learn it online. Here are just two suggestions for online beginner guides:
- The JavaScript For Cats web page
- The free Intro to JavaScript video course
To create your own apps, it is particularly usefull to learn about strings, values, variables, loops, arrays, objects and using functions.
The App Object
Out of the box you get one predefined object: the app object. It contains three base objects that you need to work with:
| Object | Explanation |
|---|---|
app.input |
This contains the exact data structure as is was retrieved from the data source, converted to a Javascript object. |
app.props |
This contains the app-specific properties that you have defined for this app. |
app.format |
This is an object with several formatting functions, that allows you to easily apply formatting to your text strings. |
app.output |
This is where you write your formatted articles to. |
In addition, there are the following functions that help you create appropriate objects:
| Function | Explanation |
|---|---|
app.createArticle() |
Create an article object that can be added to the output. |
app.createLine(param1, param2, ...) |
Create an single line followed by a line break. Pass in the contents of the line as a parameter. If you pass in multiple content blocks, they will be concatenated. Allowed content is text, formatted text and in-text images. In a horizontal ticker, you would typically only use lines. |
app.createParagraph(param1, param2, ...) |
Create an paragraph. Pass in the contents of the paragraph as a parameter. If you pass in multiple content blocks, they will be concatenated. Allowed content is text, formatted text and in-text images. Unlike a line, a paragraph has a bottom margin with the height of one text line. |
app.createBlock(param1, param2, ...) |
Create an block. Pass in the contents of the block as a parameter. If you pass in multiple content blocks, they will be concatenated. You can add any kind of content to a block. |
app.createImage(url) |
Create an image with the passed in URL. Use this image in blocks of text. |
app.createInTextImage(url) |
Create an in-text image with the passed in URL. Use this image in lines of text, specifically in a horizontal ticker. |
app.createTable(relativeColumnWidths, columnHeaders, relativeRowHeights) |
Create a table object. Optionally you can pass in:
|
app.playbackContext(key) |
Get data from the current playback context. You can request the following data with the key parameter:
|
Input
You read your data from the app.input object. In many cases, this is a list structure, e.g.
[
    { home_team: "Boxers", visiting_team: "Jets", score: "6-4" },
    { home_team: "Fiskers", visiting_team: "Blokes", score: "3-4" },
    { home_team: "Patriots", visiting_team: "Angels", score: "3-6" }
]
Props
The app.props object gives you access to the app-specific properties you have configured. You can access them by their "camelized" name as described in this "using app-specific properties"-section. E.g. a property with name "Location name" is available as app.props.locationName. All properties have a value that corresponds to their type. In case of a multi-select enumeration, this is an array of selected options.
Format
The app.format object gives you a range of text formatting functions that operate both on individual strings, as well as an array of strings.
| Function | Explanation |
|---|---|
app.format.bold(singleOrMultipleStrings) |
Make the single or multiple text strings bold and return that as its result. |
app.format.italic(singleOrMultipleStrings) |
Make the single or multiple text strings italic and return that as its result. |
app.format.fontType(singleOrMultipleStrings, fontName) |
Set the font type of the single or multiple text strings and return that as its result. |
app.format.relativeTextSize(singleOrMultipleStrings, value) |
Set the relative text size of the single or multiple text strings and return that as its result. The text size is relative to its parent container, but in most cases this is relative to the base text size. For example, a value of 2 will render the text twice as tall as its parent, whereas a value of 0.5 will render it half as tall. |
app.format.textColor(singleOrMultipleStrings, cssColorValue) |
Set the color of the single or multiple text strings to the cssColorValue and return that as its result. |
app.format.textShadow(singleOrMultipleStrings) |
Set a text shadow for the single or multiple text strings and return that as its result. |
app.format.alignLeft(singleOrMultipleStrings) |
Set the single or multiple text strings to be aligned left (only works when it's added to a paragraph or table cell) and return that as its result. |
app.format.alignCenter(singleOrMultipleStrings) |
Set the single or multiple text strings to be aligned to the center (only works when it's added to a paragraph or table cell) and return that as its result. |
app.format.alignRight(singleOrMultipleStrings) |
Set the single or multiple text strings to be aligned right (only works when it's added to a paragraph or table cell) and return that as its result. |
app.format.verticalAlignTop(singleOrMultipleStrings) |
Set the single or multiple text strings to be vertically aligned to the top (only works when it's added to a paragraph or table cell) and return that as its result. |
app.format.verticalAlignMiddle(singleOrMultipleStrings) |
Set the single or multiple text strings to be vertically aligned to the middle (only works when it's added to a paragraph or table cell) and return that as its result. |
app.format.verticalAlignBottom(singleOrMultipleStrings) |
Set the single or multiple text strings to be vertically aligned to the bottom (only works when it's added to a paragraph or table cell) and return that as its result. |
app.format.lineHeight(singleOrMultipleStrings, value) |
Set the line height of the text. When the passed in value is numeric, it is assumed to be a percentual line height. Alternatively you can pass in a string to set a specific CSS-compatible line height, like 1.2em to set a line height relative to the font size. |
Here's an example of how you apply the above functions:
var game = input[0];
var gameDescription = game.home_team + " against " + game.visiting_team + " ended in " + app.format.bold(game.score);
var descriptionInRed = app.format.textColor(gameDescription, "#FF0000");
Article
Basics
Articles are the main building blocks of your app. Typically, you convert individual items from the data source into formatted articles. You do this by creating a new article for each item like this:
var article = app.createArticle();Next you add content by using the add function:
article.add(game.description);If you pass in multiple parameters, they will be concatenated:
article.add(game.home_team, " against ", game.visiting_team, " ended in ", app.format.bold(game.score))In general, though, you will most probable add more complex blocks to create some logical formatting. You can chose from lines, paragraphs, blocks, images and tables.
For example:
var game = input[0];
var article = app.createArticle();
article.add(app.createLine(app.format.bold("Latest game")));
article.add(app.createParagraph(game.home_team, " against ", game.visiting_team, " ended in ", app.format.bold(game.score)));
The following functions are available on the article object:
| Function | Explanation |
|---|---|
add(contentObject) |
Add a content object to the article. |
background(cssBackgroundValue) |
Set the background of the article to the passed in cssBackgroundValue value. |
backgroundImage(url) |
Set the passed in image as the background for this article. It will cover the entire article background. |
backgroundSize(value) |
Set the size of the background image. This function accepts the css values of the background-size property. The default value is cover. |
backgroundPosition(value) |
Set the position of the background image. This function accepts the css values of the background-position property. The default value is center. |
backgroundColor(color) |
Set the color of the background of the entire article to the passed in css color. |
backgroundBlendMode(mode) |
Set the way the background image and color will blend with each other to the passed in css blend mode. Most commonly you would use this to darken the background image with blend mode darken and background color rgba(0,0,0,0.2) or to lighten the background image with blend mode lighten and background color rgba(255,255,255,0.2). |
Components Of An Article
Line
A Line represents a single line of text and or inline image. This is typically a line you use in a horizontal ticker.
When you use the line in a block of text, each line will end with a line break. You can create a new Line object with the
app.createLine function. Pass in one or more parameters to compose the line of text, e.g.:
var line = app.createLine("Some", app.format.bold("Header"));Only basic text-like parameters are accepted: simple strings, formatted text and in-text images.
After you have created the line, you can add more content to it, using the line.add(content) function, where line refers to the previously created line.
Paragraph
A Paragraph is almost identical to a Line with the exception that a paragraph is block of text with a bottom
margin of one text line. You can create a new Paragraph object with the app.createParagraph function. Pass in one
or more parameters to compose the paragraph text, e.g.:
var paragraph = app.createParagraph("Some", app.format.bold("Header"));Only basic text-like parameters are accepted: simple strings, formatted text and in-text images. Note that in-text images will render an image inline with the text. If you want an image next to a block of text, then you should add a separate regular image to the article right before or after the paragraph and make sure it is in inline-aligned right or left:
var paragraph = app.createParagraph("Some", app.format.bold("Header"));
var image = app.createImage(team.logo).inlineLeft();
article.add(i, paragraph);
After you have created the paragraph, you can add more content to it, using the paragraph.add(content) function, where paragraph refers to the previously created paragraph.
In-Text Image
An InTextImage object represents an image that is displayed on a single line of text. As such, you can concatenate the image with regular text. It's particularly useful to use as an image on a horizontal ticker line. Use the app.createInTextImage(url) function to create such an image with the passed in web address.
An in-text image has the following formatting functions:
| Function | Explanation |
|---|---|
width(width) |
Set the width of the image. Pass in a number which represents the percentage of the width the image's parent container. |
cropHeight(width) |
Use a number from 0 to 100 to narrow the vertical view window. The image is always centered in that window. |
cropWidth(width) |
Use a number from 0 to 100 to narrow the horizontal view window. The image is always centered in that window. |
margin(amount), marginTop(amount), marginRight(amount), marginBottom(amount), marginLeft(amount) |
Sets the image's (outer) margin either for all sides at ones or for individual sides. If you pass in a number, then this represents the percentage of the width of the block's parent container. You can also enter fixed size margin by passing in a string like "5px". |
For example:
var image = app.createInTextImage(item.url).
  cropHeight(60).
  width(10).
  marginRight(1);

article.add(app.createLine(image, item.title, "  -  "));
Image
A regular Image object takes up a block and is always added to an article and not a line or paragraph. By default, the image
occupies the entire space in the article, unless you narrow it and set it to inlineRight() or inlineLeft(), in which case
the adjacent paragraph or line will wrap around the image. Use the app.createImage(url) function to create such an image with
the passed in web address.
An image has the following formatting functions:
| Function | Explanation |
|---|---|
width(width) |
Set the width of the image. Pass in a number which represents the percentage of the width the block's parent container. |
cropHeight(width) |
Use a number from 0 to 100 to narrow the vertical view window. The image is always centered in that window. |
cropWidth(width) |
Use a number from 0 to 100 to narrow the horizontal view window. The image is always centered in that window. |
borderWidth(width) |
Set the border width in pixels. |
borderRadius(width) |
Create rounded corners. You can pass in a number, which is treated as a percentage of the width and height of sides that are connected by the corner it concerns. But this might lead to unevenly rounded corners. This is best fixed by passing in a fixed pixel value like so: borderRadius("10px"). |
borderColor(cssColorValue) |
Set the color of the borders to the passed in cssColorValue. |
margin(amount), marginTop(amount), marginRight(amount), marginBottom(amount), marginLeft(amount) |
Sets the block's (outer) margin either for all sides at ones or for individual sides. If you pass in a number, then this represents the percentage of the width of the block's parent container. You can also enter fixed size margin by passing in a string like "5px". |
alignLeft() |
Align the image left; this will only work in conjunction with a width smaller than 100%. The image will still take up all the vertical space. |
alignCenter() |
Align the image to the center; this will only work in conjunction with a width smaller than 100%. The image will still take up all the vertical space. |
alignRight() |
Align the image right; this will only work in conjunction with a width smaller than 100%. The image will still take up all the vertical space. |
inlineLeft() |
Align the image left; this will only work in conjunction with a width smaller than 100%. The image will not take up all the vertical space. Instead adjecent text will wrap around it. |
inlineRight() |
Align the image right; this will only work in conjunction with a width smaller than 100%. The image will not take up all the vertical space. Instead adjecent text will wrap around it. |
shadow(size) |
Add a drop shadow to the block. If no size is given, a value of 5 is used. |
It's nice to know that you can concatenate these function calls like so:
var image = app.createImage(item.enclosure["@url"]).
  width(50).
  margin("1% 5% 2% 0").
  alignCenter().
  cropHeight(50).
  borderWidth("2px").
  borderColor("#666").
  borderRadius("20px").
  shadow();
Block
A Block object is a structural element that can contain all other element types, just like an article can. It's particularly
convenient to use in a table cell, for example. You can pass one or more parameters into the app.createBlock function,
which will concatenate all of them into one block:
var block = app.createBlock(app.createParagraph("Some text"), app.createImage(team.logo).inlineLeft());A block has many formatting functions:
| Function | Explanation |
|---|---|
add(content) |
Add a piece of content to the block. This is added after the items that have been passed in in the app.createBlock function. |
width(width) |
Set the width of the block. Pass in a number which represents the percentage of the width the block's parent container. |
height(height) |
Set the height of the block. Pass in a number which represents the percentage of the height the block's parent container. |
lineHeight(lineHeight) |
Set the line height of the text. When the passed in value is numeric, it is assumed to be a percentual line height. Alternatively you can pass in a string to set a specific CSS-compatible line height, like 1.2em to set a line height relative to the font size. |
backgroundColor(cssColorValue) |
Set the background color of the block to the passed in cssColorValue. |
background(cssBackgroundValue) |
Set the background of the block to the passed in cssBackgroundValue value. |
borderWidth(width) |
Set the border width in pixels. |
borderRadius(width) |
Creates rounded corners. You can pass in a number, which is treated as a percentage of the width and height of the corner it is on. But this might lead to unevenly rounded corners. This is best fixed by passing in a fixed pixel value like so: borderRadius("10px"). |
borderWidth(width) |
Set the border width in pixels. |
borderColor(cssColorValue) |
Set the color of the borders to the passed in cssColorValue. |
padding(amount), paddingTop(amount), paddingRight(amount), paddingBottom(amount), paddingLeft(amount) |
Sets the block's padding (inner margin) either for all sides at ones or for individual sides. If you pass in a number, then this represents the percentage of the width of the block's parent container. You can also enter fixed size padding by passing in a string like "5px". |
margin(amount), marginTop(amount), marginRight(amount), marginBottom(amount), marginLeft(amount) |
Sets the block's (outer) margin either for all sides at ones or for individual sides. If you pass in a number, then this represents the percentage of the width of the block's parent container. You can also enter fixed size margin by passing in a string like "5px". |
inline() |
Set the block to be rendered on the same line as the previous element. |
preventElementWrapping() |
Prevent elements contained in the block to be automatically wrapped to the next line when it is too narrow. |
alignContentLeft() |
Align the text inside the block left. |
alignContentCenter() |
Align the text inside the block to the center. |
alignContentRight() |
Align the text inside the block right. |
alignBottom() |
Snap the block to the bottom of the parent container. |
alignRight() |
Snap the block to the right of the parent container. |
hideOverflow() |
Hide any content that flows outside of the block. |
shadow(size) |
Add a drop shadow to the block. If no size is given, a value of 5 is used. |
fontType(fontName) |
Set the font type of the text inside the block. |
textColor(cssColorValue) |
Set the color of the text inside the block to the cssColorValue. |
animatable() |
Make the block participate in a page animation during playback. |
Here's an example:
var timeBlock = app.createBlock(
    app.createLine(dayName),
    app.createLine(app.format.relativeTextSize(formattedDate, 1.5)),
    app.createLine(""),
    app.createLine(location)
  ).backgroundColor("rgba(73,73,73,0.85)").
    textColor("white").
    marginTop(10).
    padding(5).
    alignContentRight().
    animatable();
Table
A table object enables you to visualize a list of data as a table. User the app.createTable function to easily lets create a new table, optionally initialized with relative column widths and column headers:
var table = app.createTable([2,2,1], ["Home team", "Visiting team", "Score"]);As mentioned with the format function, you can also format arrays of text strings. This is especially convenient for formatting arrays with texts for multiple columns, e.g.
var boldHeaders = app.format.bold(["Home team", "Visiting team", "Score"]);
var table = app.createTable([2,2,1], boldHeaders);
The table object itself supports the following functions:
| Function | Explanation |
|---|---|
addRow(columnTexts) |
Add an array of text strings as a new row to the table. |
relativeColumnWidths(relativeColumnWidths) |
If you haven't set the relative column widths during creation of the table, then you can still do it after the fact using this function. You need to pass in an array of numbers that represent the relative widths of each column, e.g. [1,3,2] will make column 1 1/6 of the width, column 2 3/6 of the width and column 3 2/6 of the width. |
relativeRowHeights(relativeRowHeights) |
If you haven't set the relative row heights during creation of the table, then you can still do it after the fact using this function. You need to pass in an array of numbers that represent the relative heights of each row, e.g. [1,3,2] will make row 1 1/6 of the table height, row 2 3/6 of the table height and row 3 2/6 of the table height. If there is a header row, this is considered to be the first one. Note that setting the relative row heights will set the table height to 100% of the parent container. |
headerRow(columnHeaders) |
If you haven't set the column headers during creation of the table, then you can still do it after the fact using this function. You need to pass in an array with text strings to be shown in the header of each column, e.g. ["Home team", "Visiting team", "Score"]. |
padding(amount) |
Sets the cell padding. If you pass in a number, then the unit is "pixels", but you can also enter relative padding by passing in a string like "2%". |
lineHeight(lineHeight) |
Set the line height of the text. When the passed in value is numeric, it is assumed to be a percentual line height. Alternatively you can pass in a string to set a specific CSS-compatible line height, like 1.2em to set a line height relative to the font size. |
borderWidth(width) |
Sets the border width in pixels. |
rowAlignTop() |
Align the table contents with the top of each cell. |
rowAlignCenter() |
Align the table contents with the center of each cell. |
rowAlignBottom() |
Align the table contents with the bottom of each cell. |
borderColor(cssColorValue) |
Set the color of the borders to the passed in cssColorValue. |
headerRowColor(cssColorValue) |
Set the background color of the header row to the passed in cssColorValue. |
headerRowBackground(cssBackgroundValue) |
Set the background of the header row to the passed in cssBackgroundValue value. |
rowColor(cssColorValue) |
Set the background color of all regular rows to the passed in cssColorValue. |
rowBackground(cssBackgroundValue) |
Set the background of all regular rows to the passed in cssBackgroundValue value. |
evenRowColor(cssColorValue) |
Set an alternate background color for all even rows to the passed in cssColorValue. |
evenRowBackground(cssBackgroundValue) |
Set an alternate background for all even rows to the passed in cssBackgroundValue value. |
For example:
var table = app.createTable([2,2,1], ["Home team", "Visiting team", "Score"]).
  addRow([input[0].home_team], input[0].visiting_team, input[0].score).
  borderWidth(2).
  borderColor("#CDCDCD").
  headerRowBackground("linear-gradient(#F0F0F0, #E0E0E0)");
Output
Now that we have seen all ways to format data into visualizable structures there is on thing left to do: write the created visualization to the app.output object. Only then will the newly created article be shown either upon each single article refresh or in the ticker. There is only one function you need to do this:
| Function | Explanation |
|---|---|
add(article) |
Add an article object to the output set so that it will be shown in the article playback cycle. |
Complete "Single Article" Example
It's time for a complete example. Let's starts with one in which we create just one article to be shown as a single article, like so:
First there is the input we used in the previous examples as well:
[
{ home_team: "Boxers", visiting_team: "Jets", score: "6-4" },
{ home_team: "Fiskers", visiting_team: "Blokes", score: "3-4" },
{ home_team: "Patriots", visiting_team: "Angels", score: "3-6" }
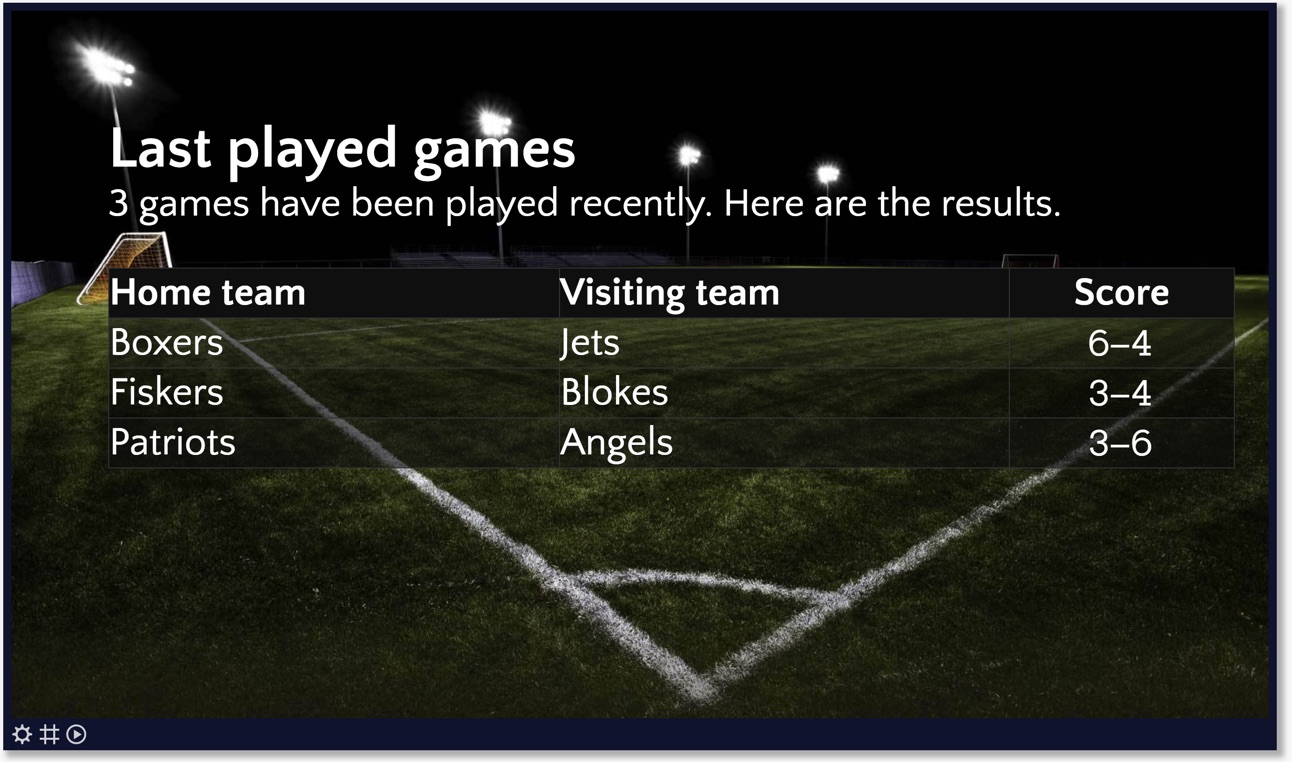
]Let's turn that into a title and some lead in text, followed by a table created by iterating over every entry in the input data.
var article = app.createArticle();

var title = app.createLine(app.format.relativeTextSize(app.format.bold("Last played games"), 1.5));
var leadIn = app.createParagraph(app.input.length, " games have been played recently. Here are the results.");

var table = app.createTable([2,2,1], ["Home team", "Visiting team", app.format.alignCenter("Score")]).
  borderColor("#333").
  borderWidth(1).
  headerRowBackground("linear-gradient(#101010, #101010)").
  rowColor("rgba(15,15,15,0.6)").
  evenRowColor("rgba(5,5,5,0.6)");

for (var i = 0; i < app.input.length; i++) {
  var game = app.input[i];

  table.addRow([
    game.home_team,
    game.visiting_team,
    app.format.alignCenter(app.format.fontType(game.score, "Anonymous Pro"))
  ]);
}

var article = app.createArticle().
  add(title).
  add(leadIn).
  add(table);

app.output.add(article);
Since we'll be creating one big table, we will create just one article. Next we create a nicely formatted one-line title, followed by a lead in text as paragraph to get the bonus of the bottom margin.
Next we compile the table. We start off with a new table with some relative column widths and a header row, followed by formatting the table. Note the different ways you can specify colors:
- by common names, like white, red, yellow, etc.
- by RGB hexadecimal string, e.g. #FF8810, #421
- with RGB decimals, e.g. rgb(250, 249, 128)
- with RGBA numbers, where the A is the alpha (or opacity) value ranging from 0 to 1, e.g. rgba(15,15,15,0.6)
- by setting the background (not the background color) to a linear-gradient creating a nice gradient effect, e.g. linear-gradient(#101010, #101010)
We iterate over the input and for each game found we create new row with game information. When the table is complete, we add the title, lead-in text and the table itself to the article. Finally, the one article is added to the output.
Complete "Ticker" Example
Here's another example in which we create a ticker with the game results, using the same input from the previous examples.
for (var i = 0; i < app.input.length; i++) {
  var game = app.input[i];

  var article = app.createArticle();
  var line = app.createLine(game.home_team, " vs. ", game.visiting_team, ": ", app.format.bold(game.score), "   |   ");
  article.add(line);
  app.output.add(article);
}
In this example we iterate over every entry in the input data again, but this time we create an article per game. The article contains just one line mentioning both teams followed by the score and an article seperator.
Tips
Complex Layouts With Tables
Tables are an effective way to create more complex article layouts. With a table padding and border width of 0, you create an invisible grid. Put blocks into table cells to create separately styled areas on the page.
For example:
var article = app.createArticle();
article.backgroundImage(item.image);

var table = app.createTable([1,10,1,10]).padding("3%").borderColor("transparent");

// DESCRIPTION BLOCK
var title = app.format.relativeTextSize(app.format.bold(app.format.textColor(item.title, "#494949")), 1.8);
var text = app.format.textColor(item.summary, "white");
var descriptionBlock = app.createBlock(
  app.createBlock(title).paddingBottom(4),
  app.createParagraph(text)
).backgroundColor("rgba(254,69,0,0.85)").
  padding("12% 10% 10%");

// LOCATION & TIME BLOCK
var location = (item.by ? item.by + " - " : "") + item.location;
var dayName = date.format("dddd");
var formattedDate = date.format("D MMMM, ") + item.time;

var locationAndTimeBlock = app.createBlock(
  app.createLine(dayName),
  app.createLine(app.format.relativeTextSize(formattedDate, 1.5)),
  app.createLine(""),
  app.createLine(location)
).backgroundColor("rgba(73,73,73,0.85)").
  textColor("white").
  marginTop(10).
  padding(5).
  alignContentRight();

table.addRow("", descriptionBlock, "", locationAndTimeBlock).
  padding(0).
  rowAlignTop();

article.addTable(table);
app.output.addArticle(article);
Debugging
Writing the transformation logic can be tricky and it is easy to make a mistake or two. To monitor if there are any errors in your logic, you can use the development tools of you browser in which you can see the network requests that retrieve the data from your data source as well as errors that occur when running your transformation logic. Here are the links to the descriptions of how you open these tools in Chrome, Firefox and Safari.
You can also debug your transition logic by placing a breakpoint in your code and then stepping through it. You can add a breakpoint by putting the debugger; command in your logic. Then make sure that your browser's development tools are open. The next time your transition logic is run, it will stop on the line with the debugger; statement. From here you can inspect the values of variables and step through your code.
For example:
for (var i = 0; i < app.input.length; i++) {
  var game = app.input[i];
  debugger;
  var article = app.createArticle();
  var line = app.createLine(game.home_team, " vs. ", game.visiting_team, ": ", app.format.bold(game.score), "   |   ");
  article.add(line);
  app.output.add(article);
}