Porteus Kiosk
The Porteus Kiosk is free software, with the option to pay for automatic updates, based on Linux and other open source components that turns a PC into a kiosk that boots straight into a browser. The official website of Porteus Kiosk can be found here. The software can be run from a USB thumb drive but we advise to use the install option and use that to install the software on an internal SSD.
Porteus Kiosk can only be used on a "regular" computer (for instance an Intel NUC). You cannot put it on a USB flash drive and run it on a TV directly, an Android device or a Chromebox. It can also not be used on Raspberry Pis or other ARM based devices.
The steps that are needed to get Porteus Kiosk running on your device are as follows:
- Download the Porteus Kiosk software
- put it on a USB thumb drive
- run the software, after you choose options from a wizard, the software is installed on your device
- remove the USB thumb drive and restart the device The player will now show the code that enables you to register the device, see these instuctions. After that your channel will start to play automatically.
For this you need, apart from the device/player that you want to use to playback Bizplay content and a connected TV screen:
- One USB thumb drive of at least 4GB size, from which the data can be erased
- A mouse and keyboard that you can connect to the player device
- A computer that you use to download the Porteus Kiosk software and put that on the USB thumb drive
Creating the Porteus Kiosk thumb drive
To create thumb drive with the Porteus Kiosk software on it that can be used to install the software on your device follow these steps:
- Use your computer to download the latest Porteus Kiosk software image that was tested by us. You can also find the latest image on this page but keep in mind that this can contain updates that we have not yet tested (on this page click the button named Porteus Kiosk).
- To put the downloaded image on a USB thumb drive:
- On Windows: follow this instruction
- On MacOS: follow this instruction
- On Linux: the command line tool dd as follows:
$ dd if=Porteus-Kiosk-<version>.iso of=/dev/sdX
with "sdX" being the USB thumbdrive.
Preparing the player
To correctly install Porteus, be sure to disable Secure boot in the BIOS. On most devices you can open the BIOS by pressing the F2 or DEL key immediately after startup. In modern NUCs, for instance, the Secure boot option can be found in the Boot menu, where you can choose to disable it.
Furthermore, we always recommend to configure a player to resume the last state after a power failure. That way if the player loses power, it will automatically start up again when the power comes back on. On modern NUCs you can find this option in the Power menu under Secondary power options. You can then set After power failure to Last state.
Installing the software on the player
We describe two ways to install the Porteus Kiosk software on your player. The first (fastest) way uses a standard configuration that we have prepared and is downloaded during the process. The second way takes longer but allows you to fully control all the options that Porteus Kiosk offers. In most cases the first approach is the best in the sense that it will result in a working player in the least time.
Fastest way to install the software on the player
To install the Porteus Kiosk software on the player you need to connect the player to the TV screen and connect the mouse and keyboard to the player. Then follow these steps:
- Put the USB thumb drive in one of the USB ports of the player and turn it on
- On the first screen of the start up wizard choose the type of network connection the player will use. We strongly advise to use a wired network connection. If that is not yet present you should invest in making a wired connection available for the player.
- On the next screen choose Configure connection using DHCP (unless the player needs to have a static address)
- If you chose a WiFi connection you will presented with a selection of available networks, you need to supply the encryption type and passwords if necessary
- On the next screen you can configure proxy settings, it is most likely that you can press the Next button on this screen (proxies are usually only used in enterprise environments)
- Choose the browser you want to use, we advise the use of Chrome, if you do you are presented with the Google Chrome EULA. Read it and press Ok if you agree with the EULA.
- On the confirmation screen click Next
- Now the selected browser (and possibly additional components) will be downloaded, this will take a little time
- On the next screen choose the Point kiosk to remote management configuration option
- In the entry field enter the URL:
https://playr.biz/porteus_kiosk_config, if you use an Intel NUC as player you should add?device=NUCto the url so it becomes;https://playr.biz/porteus_kiosk_config?device=NUC(see the full list of options here). - Click the Test config button. You should see a window with some lines of configuration text and click the Ok button (if no configuration text is shown check the URL you entered). On the window where you entered the URL click Ok.
- On the next screen you see a list of choices that you made, click Next
- On the next screen you can opt for a paid subscription to automatically keep the Kiosk software up to date. Please note: this subscription is paid to and fulfilled by the Porteus company. Click Next
- On the next screen (System installation) select the internal SSD(/HDD) of the player and click Install system
- If the message is shown that the the software has been installed successfully you can remove the USB thumb drive and the player will reboot automatically.
After the player reboots it will install additional packages caused by the configuration that was loaded. This only happens after this first reboot.
The player should now show the page with the Bizplay registration code. If you see the wizard screen you will probably were too late removing the USB thumb drive. No problem; just turn off the player, remove the USB thumb drive and turn the player back on. When you see the registration code please register the player as is described here.
Manually installing the software on the player
To install the Porteus Kiosk software on the player you need to connect the player to the TV screen and connect the mouse and keyboard to the player. Then follow these steps:
- Put the USB thumb drive in one of the USB ports of the player and turn it on
- On the first screen of the start up wizard choose the type of network connection the player will use. We strongly advise to use a wired network connection. If that is not yet present you should invest in making a wired connection available for the player.
- On the next screen choose Configure connection using DHCP (unless the player needs to have a static address)
- If you chose a WiFi connection you will presented with a selection of available networks, you need to supply the encryption type and passwords if necessary
- On the next screen you can configure proxy settings, it is most likely that you can press the Next button on this screen (proxies are usually only used in enterprise environments)
- Choose the browser you want to use, we advise the use of Chrome, if you do you are presented with the Google Chrome EULA. Read it and press Ok if you agree with the EULA.
- On the confirmation screen click Next
- Now the selected browser (and possibly additional components) will be downloaded, this will take a little time
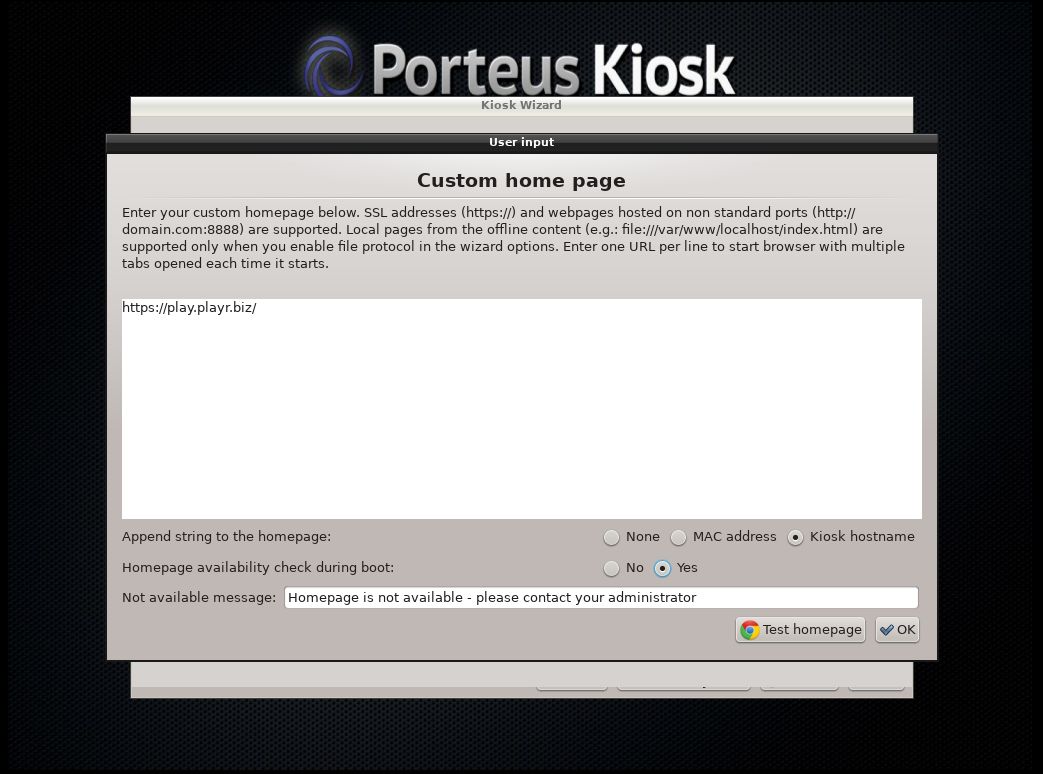
- On the next screen choose the Launch the Kiosk Wizard to create new configuration option
- In this screen change the following settings:
- Choose Enable under Homepage and on the next page
- Specify the home page: https://play.playr.biz
- Choose MAC address on; Append string to the homepage
- Choose Yes on; Homepage availability check during boot
- Click OK
- Choose Disable under Private Mode
- Choose Disable under Disable zoom controls
- If you chose the Firefox browser choose Disable under Address bar
- Choose Disable under Navigation bar
- Choose Full under Persistence level
- Choose Disable under input devices
- If you want sound (for video or streaming audio) choose Enable under Default system sound card and on the next page:
- Choose a sound device, usually the first HDMI device is correct when you connect the player to your TV using a HDMI cable
- If you want to verify your choice click Test selected card
- After a browser window appears it will play an audible sound
- Close the browser with the x button on the tab at the top
- If no sound was audible (make sure the volume of the TV is not set too low) choose a different card and click Test selected card again
- Otherwise click OK
- Under ADDITIONAL COMPONENTS choose Enable under Additional fonts
Click Next. If you have questions about the options not mentioned here please email us.
- Choose Enable under Homepage and on the next page
- The next screen sums up the settings that were configured on the previous pages, click Next
- On the next screen you can opt for a paid subscription to automatically keep the Kiosk software up to date. Please note: this subscription is paid to and fulfilled by the Porteus company. Click Next
- On the next screen (System installation) select the internal SSD(/HDD) of the player and click Install system
- If the message is shown that the the software has been installed successfully you can remove the USB thumb drive and the player will reboot automatically.
The player should now show the page with the Bizplay registration code. If you see the wizard screen you will probably were too late removing the USB thumb drive. No problem; just turn off the player, remove the USB thumb drive and turn the player back on. When you see the registration code please register the player as is described here.
Running from a USB thumb drive
It is possible to create a USB thumb drive that you can use to run Porteus Kiosk from. This means that you do not need to install an SSD in the player. Since the price of small SSDs has come down so much in the past few years we strongly advise you to use an internal SSD instead of a USB thumb drive attached to a USB port. USB thumb drives are much more sensitive to power outages and long term use; the chance that a USB thumb drive will survive multiple years in use is very small. The time you spend fixing a broken USB thumb drive by buying a new one and reinstalling Porteus Kiosk on it is likely going to be more costly than the extra money you will spend on a small SSD (8GB or more is enough, the cheapest SSD you can find will probably have more than 16GB capacity).
If you decide/need to run from a USB thumb drive you should follow the steps as described above except in step 13 you choose the USB thumb drive. The installer will then overwrite the USB thumb drive with a fully configured version of the Porteus Kiosk software and reboot. The player will then start up the Bizplay registration screen and you continue from there.
Configuring Wifi
With our Porteus Kiosk version with built-in network manager, you can reconfigure the network settings by pressing CTRL + ALT + E when Porteus is running. This brings up the Network Manager window. You can now add the WiFi network in two ways:
Easy WiFi configuration
The recommended way to add a WiFi network is as follows; at the bottom of the screen you will see a task bar with a network icon at the right hand side (two computer screens). Do the following:
- Click on the network icon and a menu will appear
- Click under the heading Wi-Fi Networks on the menu item Available networks, a list of WiFi networks will appear
- Select the WiFi network the you want to use from the list
- Enter the password (if the network is password protected)
You're done!
Custom WiFi(/network) configuration
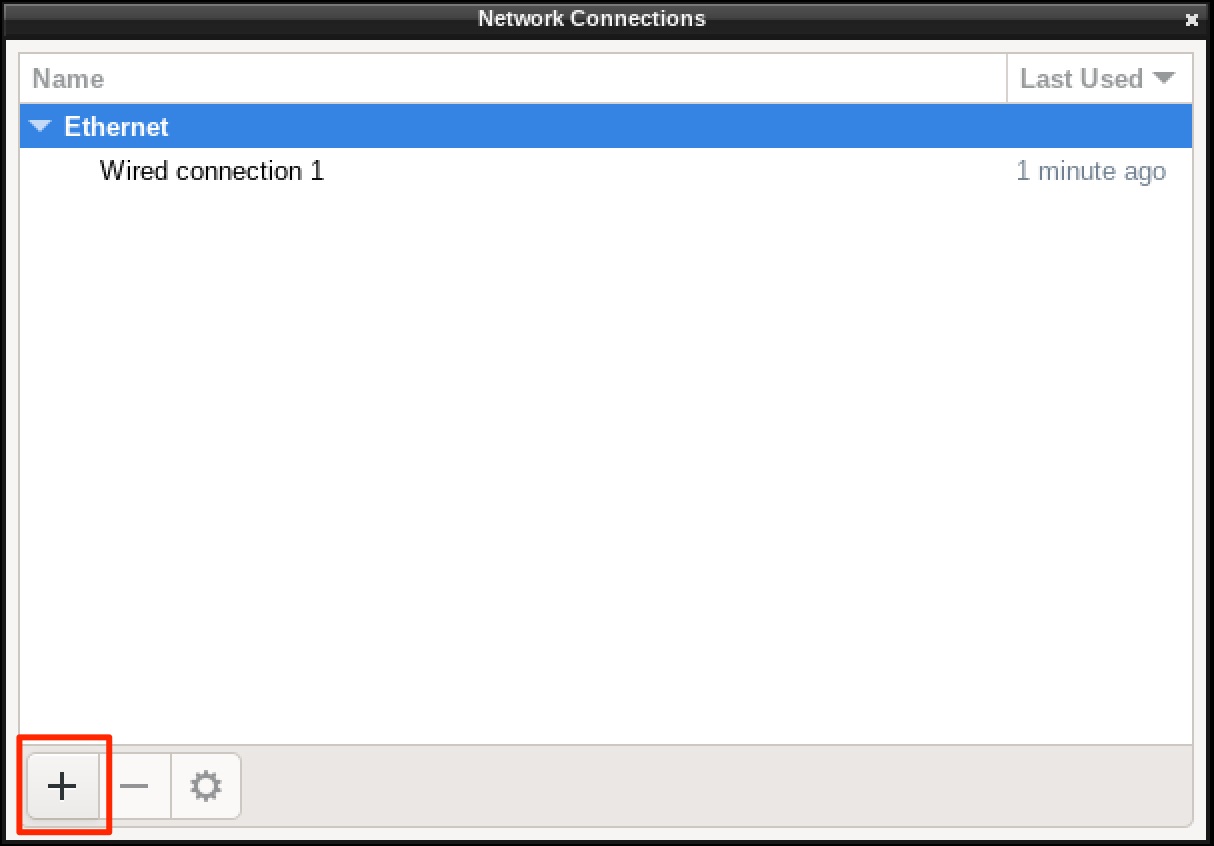
If you want to add a WiFi network that does not transmit its SSID (name) or has specific parameters that need to be set you can use the Network Manager window to customise all the aspects of a specific network connection.
- In the Network Manager window, click the + button:
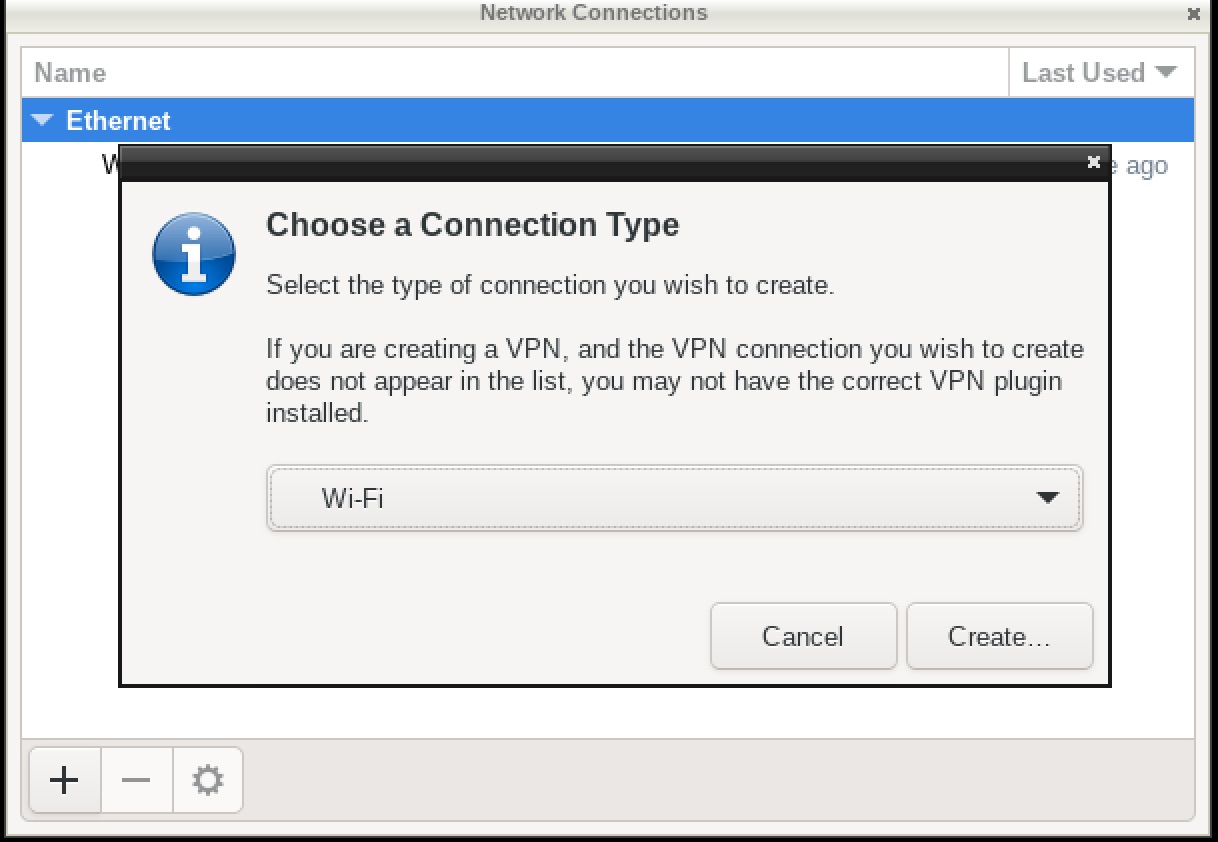
- Select the network type (Wi-Fi in this example) and click the Create... button:
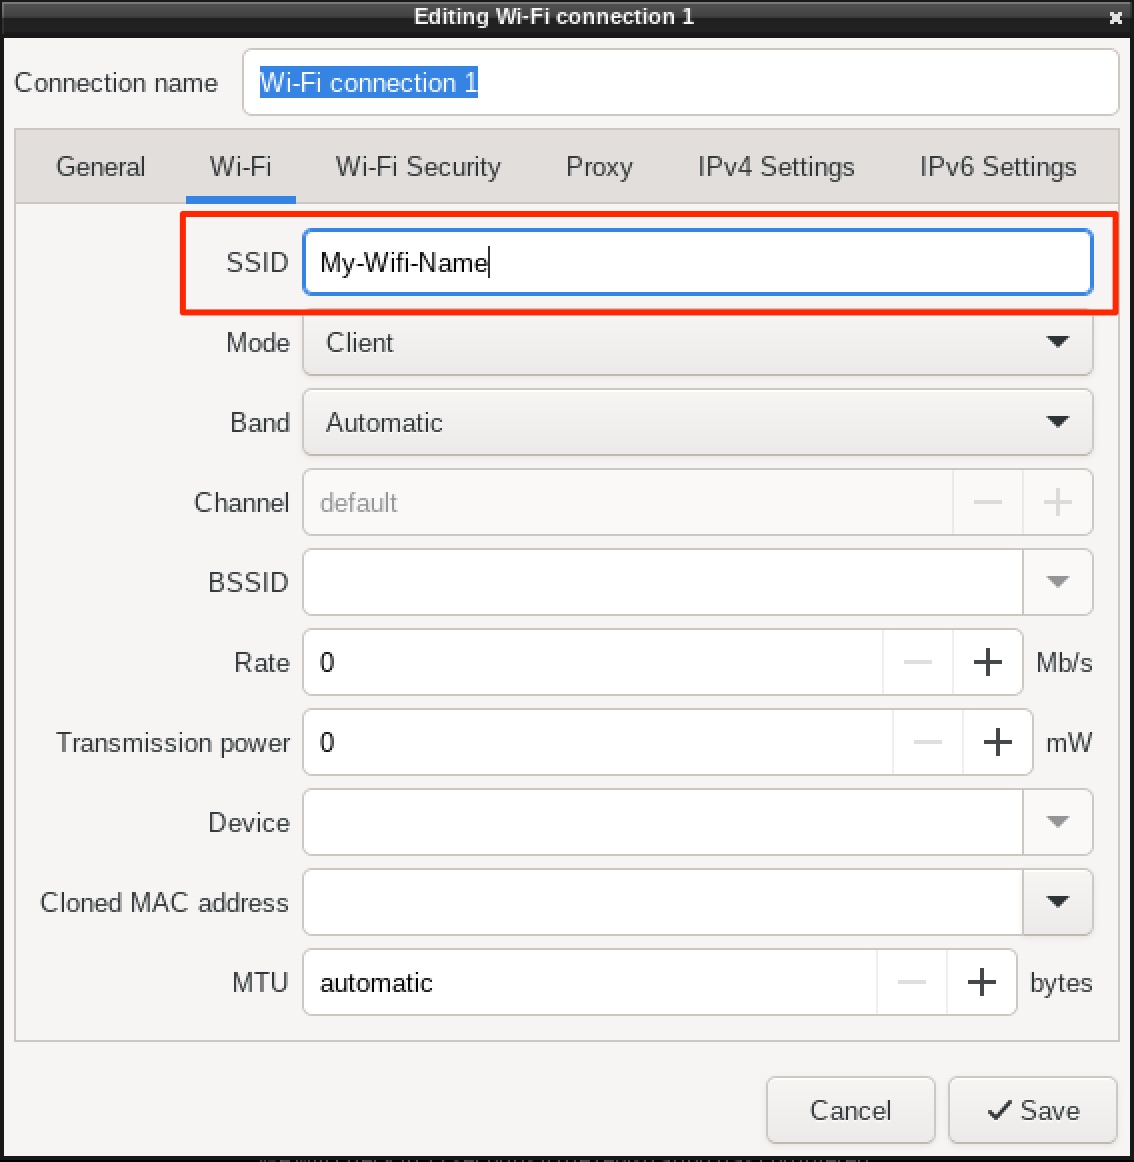
- On the Wi-Fi tab, type your wifi network name in the SSID field:
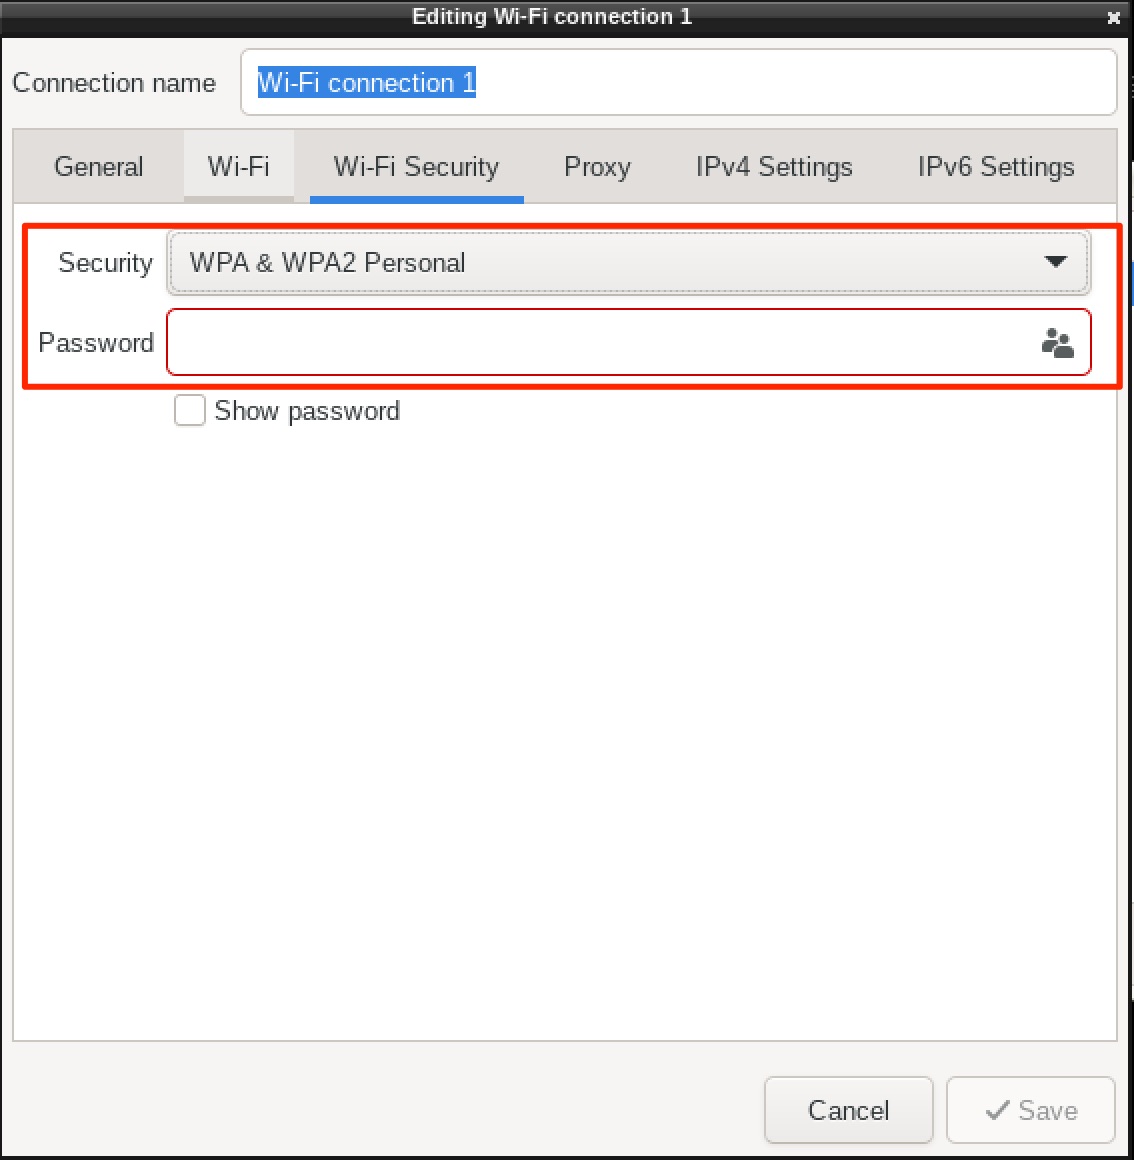
- On the Wi-Fi Security tab, select your type of network security (most likely WPA & WPA2 Personal) and fill in the password of your wifi network:
- Set any additional parameters of the connection if need be and save the new network configuration.
You're done!
Additional Configuration Options
There are a few additional configuration options you can set via the https://playr.biz/porteus_kiosk_config URL. For one, you can also use a shorthand for this URL: playr.biz/pkc.
| Parameter | Explanation |
|---|---|
device or d |
Set this to NUC if you're running Porteus on a Intel/Asus NUC. d is just a shorthand for device. |
screen_rotate |
If your Porteus device is connected to screen that is mounted vertically, you can have Porteus rotate as well. Possible values are:
|
Each parameter can be added to the URL in the format parameter_name=value, e.g. device=NUC. Multiple parameters are stringed together with a &, e.g. device=NUC&screen_rotate=left. To add the parameters to the base web address, first add a ? and then the string of parameters, e.g. https://playr.biz/porteus_kiosk_config?device=NUC&screen_rotate=left. The shorthand version would be: playr.biz/pkc?d=NUC&screen_rotate=left.
Tip for Bizplay resellers: use your own subdomain of playr.biz (or your custom domain name, if applicable) to have Porteus display your own company logo during startup.