The designer
The designer is the most creative place of Bizplay. It is here that you'll construct and/or rearrange an individual page.
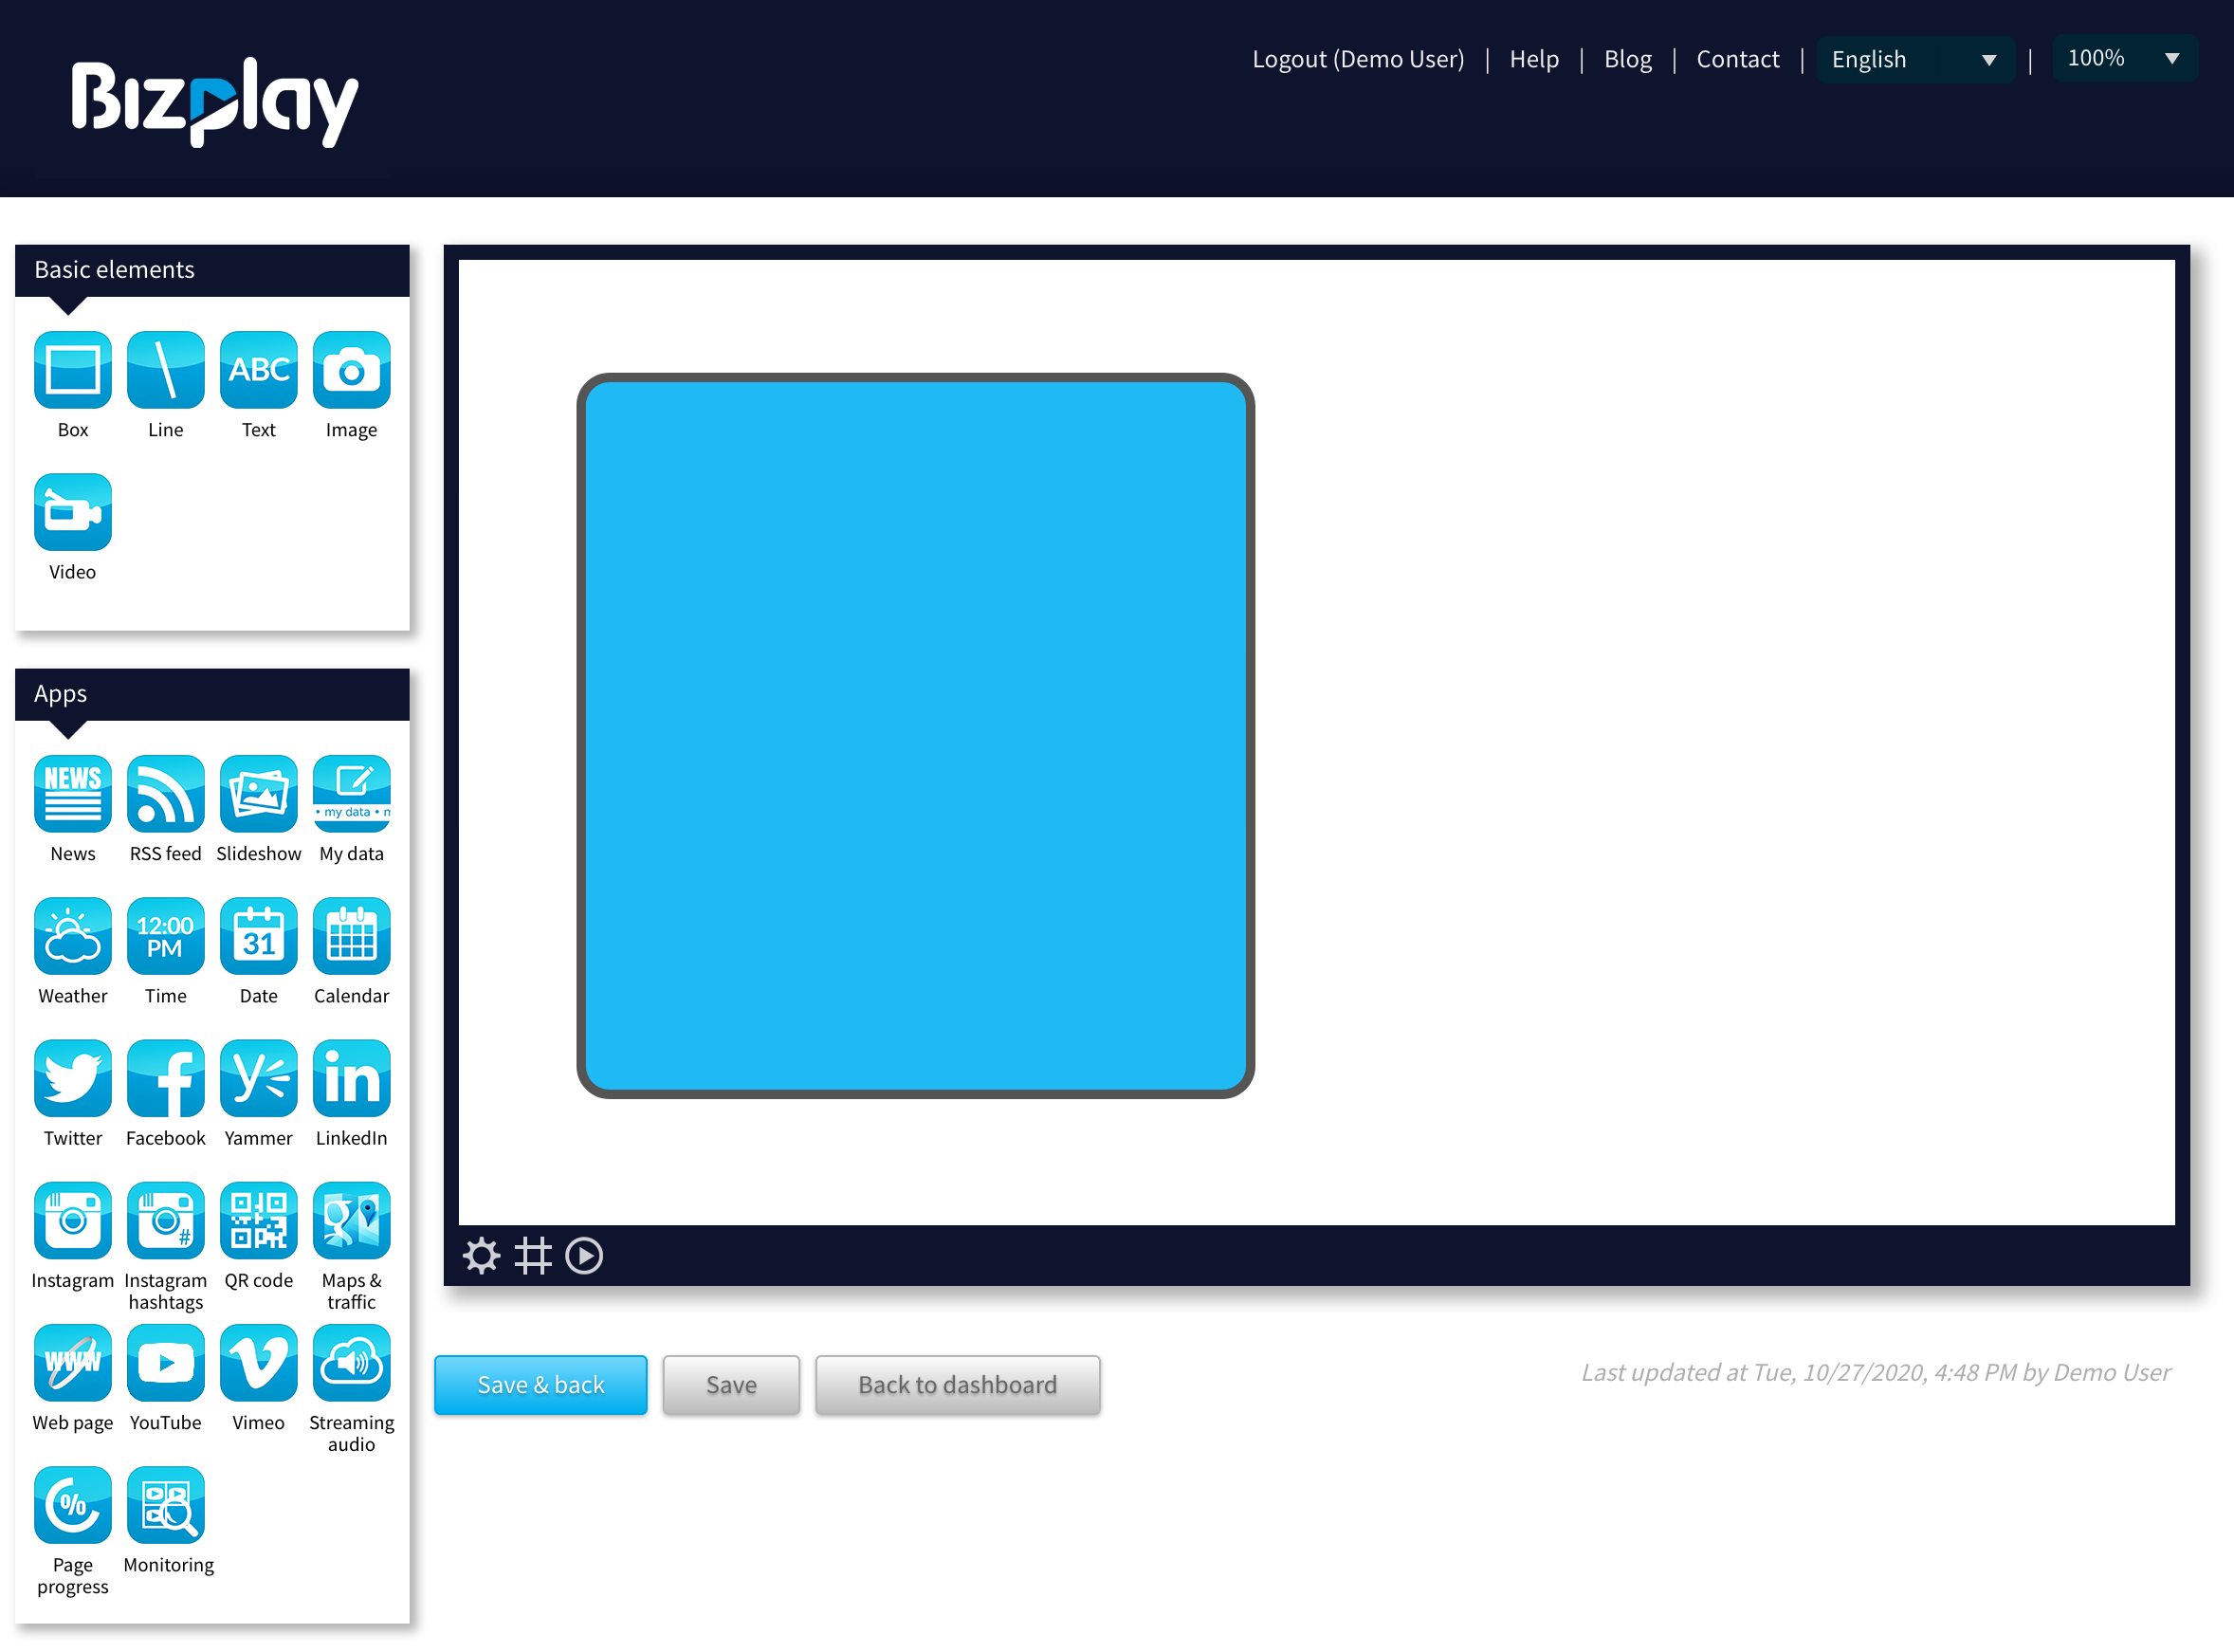
Basic Elements
It all starts with basic elements. You can create colored sections on a page using the "Box" element. Just drag it from the top left "Basic elements" box onto the canvas and a basic box shape will appear that you can now configure, resize and rotate.
It gets more interesting with the text element. When you add that to your canvas, it will automatically select the element and thereby open the associated properties box on the left hand side. Here you can configure the element as you like. You can edit the text within the element itself on the canvas.
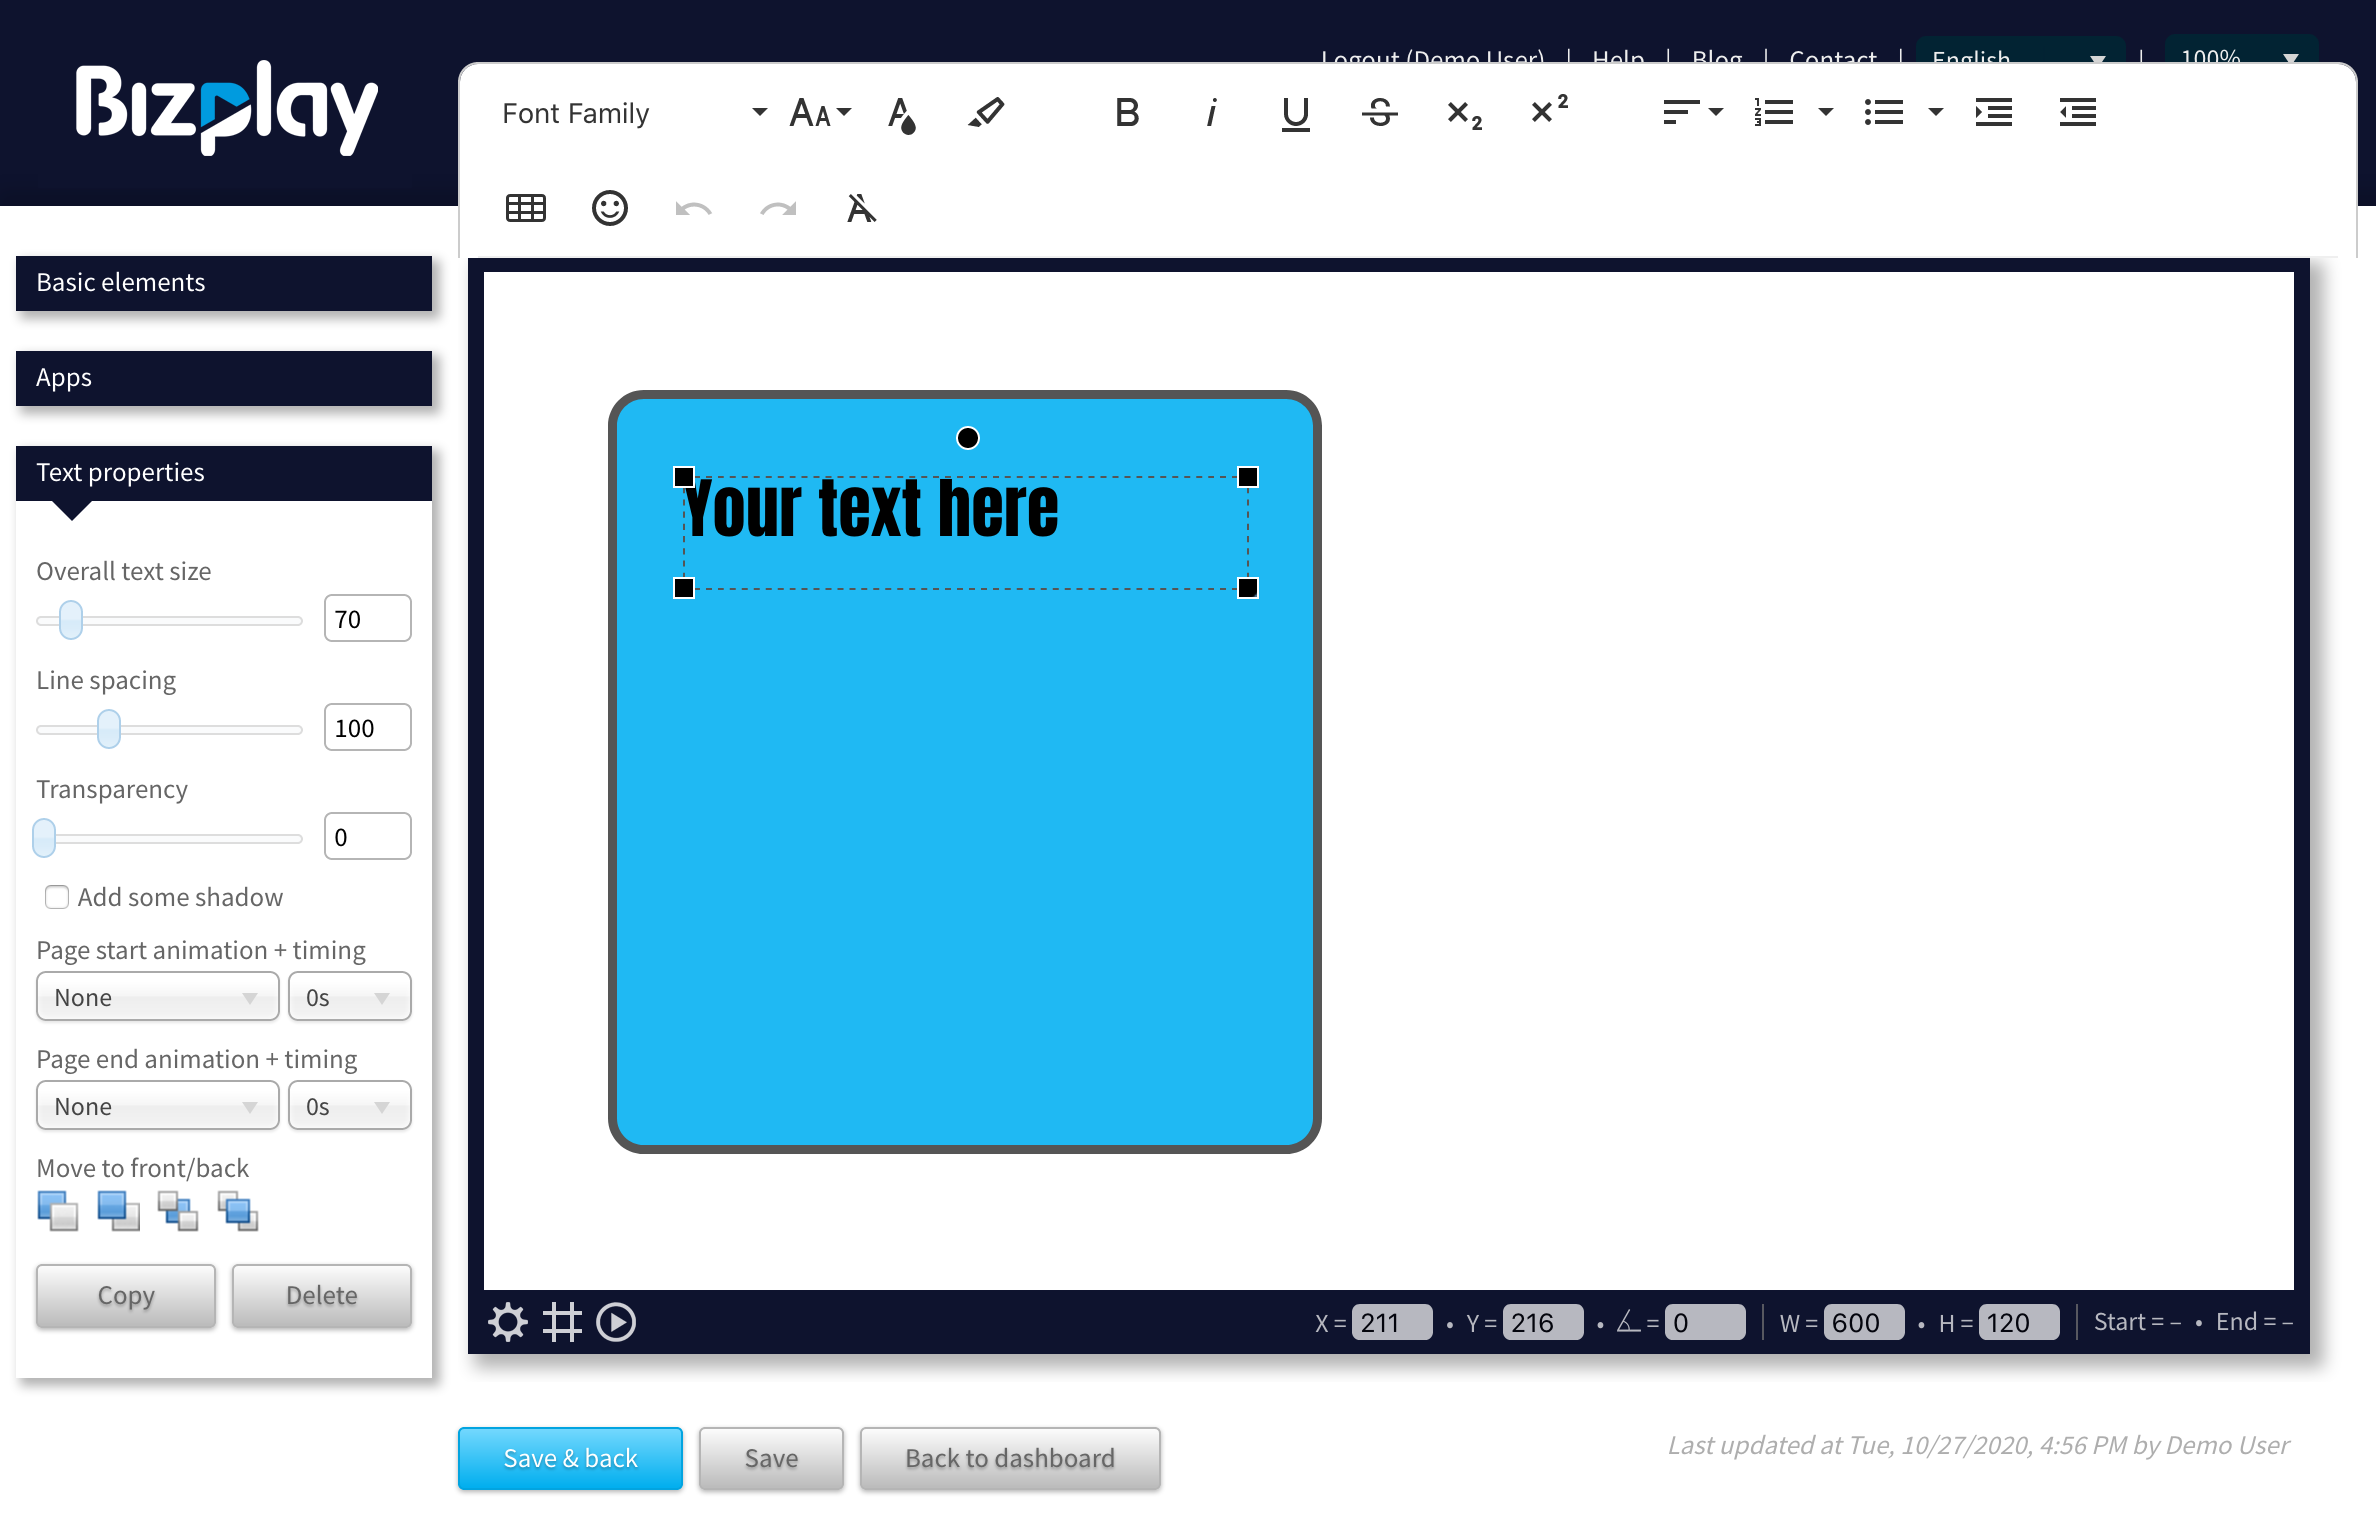
Looking at the left hand side you'll see a number of properties of the text element, like the overall font type, the font size variant (of individual text snippets), the color, several styling options, list controls, alignment, ability to add a table, presence of an (overall) drop shadow, etc. If you change any of these settings, you'll see that reflected in the element on the page design immediately.
Refer to the Page Elements sections to read all about the elements you can put on a page.
Element Info
At the bottom right hand side of the canvas you'll find basic information of the element you hover over with your mouse pointer. If you select the element, most of that information will become directly editable.

| Info | Explanation |
|---|---|
| X | The horizontal position of the element. |
| Y | The vertical position of the element. |
| Angle | The rotation angle of the element in degrees. |
| W | The width of the element. |
| H | The height of the element. |
| Start | If a page start animation is configured, this will display the corresponding timing. |
| End | If a page end animation is configured, this will display the corresponding timing. |
| Stopwatch | (For video elements only) Shows two numbers as "X/Y", where X is the current time during video playback and Y is the total video duration in seconds. |
Note that the reference resolution of a 16:9 page is 1920x1080 pixels, but that does not mean you can only play back at that resolution. Upon playback, the player will always seamlessly resize to the resolution of the playback screen.
Page Settings And Controls
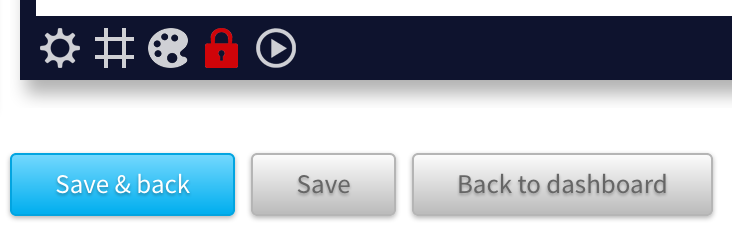
On the bottom left hand side of the canvas you'll find a few clickable icons and some buttons to configure and control the page and the designer.
| Control | Explanation |
|---|---|
| Gear icon | Opens the page properties on the left hand side, which lets you configure your page. |
| Grid icon | Displays a 20x20 pixel grid to help you align your elements. |
| Palette icon | If this page originated from a sample page collection, this icon is available. It opens the color palette of the sample page collection and can be used to change the color scheme of all corresponding pages at once. |
| Lock icon | If lock elements by default has been turned on in the company settings, then this lock icon will be red by default. This means none of the existing elements can be moved, resized, rotated or maximized. You can click the lock icon to unlock the elements. |
| Play icon | If you configured any animations on you elements, this lets you play the animations in the configured order. |
| Save & back | Saves all changes and takes you back to the dashboard. |
| Save | Only saves all changes, you stay in the designer. |
| Back to dashboard | Discards all changes and takes you back to the dashboard. |
In addition there is another "control" on the top right: a dropdown list where you can set the zoom level to zoom in and out of the design canvas.
Page Properties
You can change the following basic properties of your page:
| Property | Explanation |
|---|---|
| Ratio and orientation | This lets you set the aspect ratio of your page to match your playback screen. Most common is the default 16:9 ratio, but you can also use the older 4:3 ratio. For a vertical (or portrait oriented) screen, choose the 9:16 ratio. Alternatively, you can choose Other... which allows you to set your own base resolution (and consequently your own aspect ratio). When the current page is used in a playlist or as a background page, you cannot change its ratio or orientation. This is, because the aspect ratio needs to match that of the other pages in the playlist or of its foreground page. Good to know: the aspect ratio is remembered; the next blank page you create will have the same aspect ratio that you select here. |
| Custom base resolution | This setting allows you to achieve two things:
|
| Background page | You can select another page to be shown in the background of the page you are editing. By using one common background page for many of your pages, you can easily create a consistent layout. |
| Background color | Use this option to change the background color of your page. |
| Background image | Use this option to set a background image of your page. It will always make sure the image fills the page. If it's too large, it will center the image and "cut off" the excess bits. |
Draft Pages And The Approval Process
When you have the role of an author, any changes you make will result in the page entering a draft state. This means that the changes are saved, but will not yet be visible in any playlists or channels.
If an editor or company administrator opens the designer of a draft page, he will get the option to approve or reject the changes. If he approves these, the changes are immediately available in playlists and channels that contain the page. If he rejects the changes, they will be undone and the page will return to the state before the changes made by the author.
Shortcut Keys
In the designer you can use a number of shortcut keys to make editing even easier. Here's an overview:
| Windows or Linux | MacOS | Explanation |
|---|---|---|
| Backspace | Backspace | Delete the currently selected element. |
| Esc | Esc | Unselect the currently selected element or close the currently open dialog box. |
| + or = | + or = | Zoom in on the canvas. |
| - or _ | - or _ | Zoom out from the canvas. |
| Ctrl + C | ⌘ + C | Copy the currently selected element. |
| Ctrl + V | ⌘ + V | Paste the last copied element onto the canvas. This also works across tabs and windows within the same web browser. |
| Ctrl + Z | ⌘ + Z | Undo change. |
| Ctrl + Y | Shift + ⌘ + Z | Redo undone change. |
| Ctrl + S | ⌘ + S | Save the page. |
| Ctrl + dragging | ⌘ + dragging | Draw a rectangle to select one or more elements. |
| Ctrl + left-click | ⌘ + left-click | Add / remove the clicked element to / from the set of selected elements. |
| Alt + resizing | Alt + resizing | When you resize the element with your mouse while holding down the Alt or Ctrl key, the element will resize in steps of 20 pixels, making it easier to align elements. |
| Ctrl + Alt + ← | Ctrl + Alt + ← | Move currently selected element left 1 pixel. The short version of this is Alt + ←, but that does not work in a text element, since that will navigate in the text instead. |
| Ctrl + Alt + ↑ | Ctrl + Alt + ↑ | Move currently selected element up 1 pixel. The short version of this is Alt + ↑, but that does not work in a text element, since that will navigate in the text instead. |
| Ctrl + Alt + → | Ctrl + Alt + → | Move currently selected element right 1 pixel. The version of this is Alt + →, but that does not work in a text element, since that will navigate in the text instead. |
| Ctrl + Alt + ↓ | Ctrl + Alt + ↓ | Move currently selected element down 1 pixel. The version of this is Alt + ↓, but that does not work in a text element, since that will navigate in the text instead. |
| Alt + dragging | Alt + dragging | When you drag the element with your mouse while holding down the Alt or Ctrl key, the element will move with steps of 20 pixels, making it easier to align elements. |
| Alt + resizing | Alt + resizing | When you resize the element with your mouse while holding down the Alt or Ctrl key, the element will resize in steps of 20 pixels, making it easier to align elements. |
| Alt + rotating | Alt + rotating | When you rotate the element with your mouse while holding down the Alt or Ctrl key, the element will rotate in steps of 15 degrees. |
| Tab | ⇥ | Select the next element. This is very convenient if the element is hard to select with the mouse or invisible. |
| Shift + Tab | ⇧ + ⇥ | Select the previous element. This is very convenient if the element is hard to select with the mouse or invisible. |
| Double click | Double click | Double click on an element with your mouse to switch it to full page size. Double click again to switch back to its previous size. |
Media (Images, PDFs And Videos)
You can upload several media types (images, PDFs and videos) to our platform. To do this, add the Image element (for images and PDFs) or the Video element (for videos) to the canvas and a catalog of that media type will open up. Drag an image, PDF or video into the catalog (or use the Upload image(s) button) and the they will appear in the catalog, ready to be selected for use on your page. For a PDF document, a folder with the name of the document will be created and each page will be converted into a separate image.
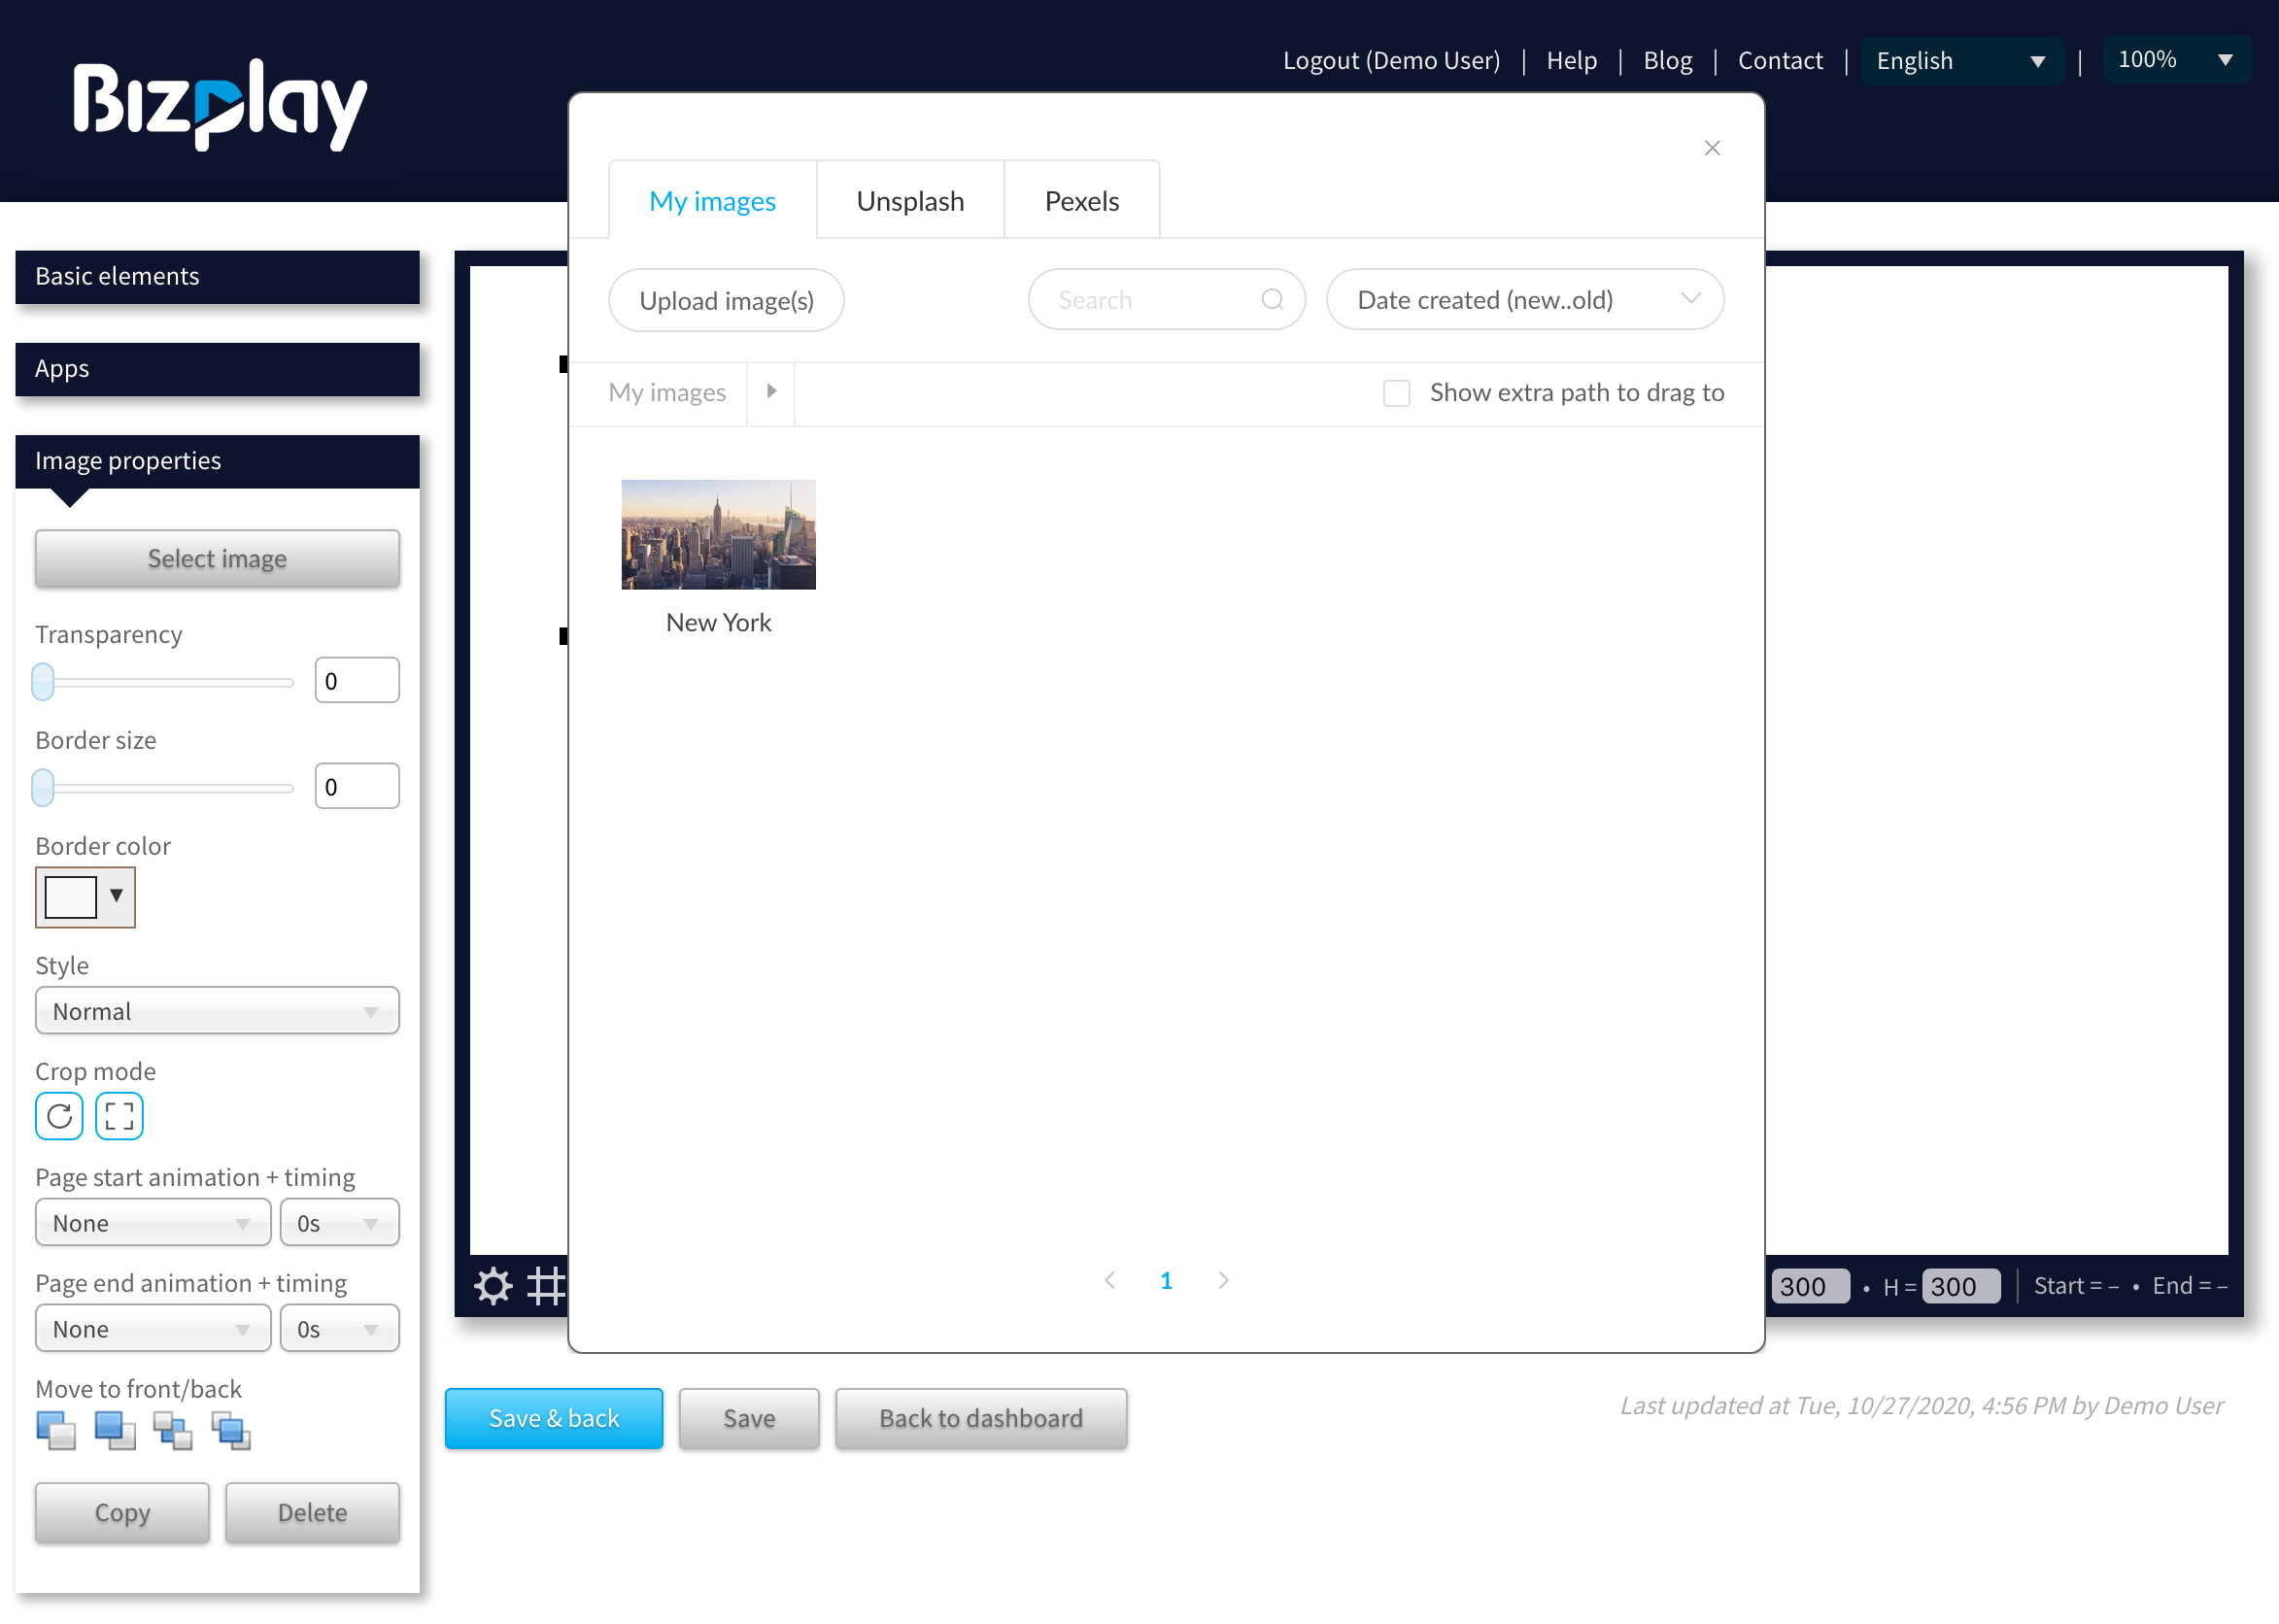
Click the uploaded media file you like to use and select the option Use from the popup menu. Alternatively, you can also double click the image or video to select it and return to the canvas.
Managing Media
You can select multiple images or videos to drag them into another folder or delete them at once:
- Click and hold the left mouse button to drag an imaginary rectangle around the items you like to select.
- Hold the Shift key and select the first and last item of the sequence you like to select.
- Hold down the Ctrl (Windows or Linux) or ⌘ (MacOS) key to add/remove individual items to/from the selected set.
To delete a selected set of items, press the Del (Windows or Linux) or Backspace (MacOS) key.
Supported Media File Types
| Media type | Supported file types | Maximum size |
|---|---|---|
| Image | jpg, jpeg, png, gif | 15MB |
| PDF document | 50 pages | |
| Video | virtually any type (it will be converted to a format that can be played in any browser, immediately after the upload has completed) | 2GB |